


Our water setup

It is amazing what you think about while you are doing mundane chores. Case in point; as I was dumping the tanks today, standing by Charlie, letting the black tank flush, I thought it would be a good idea to share with anyone interested how we have our water set up. There is any number of ways to get water from the spigot into your RV, and it is not my desire to imply this is the only or even the best way, it is just how we do it.

We have a 2018 Tiffin Open Road 34PA, and we love it. For this post, the make and model of RV make little to no difference. I only point it out because I have included photos of the wet bay and the water pump. Everything else is RV agnostic.
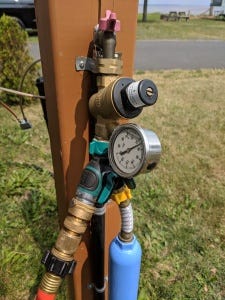
To make this sensible, we will start at the faucet in the campground. I initially used the simple flow through pressure regulator that came in the “welcome kit” we got when we bought Charlie. It was not long before we realized that this regulator cut the flow down too much. After looking online, I purchased a Renator M11-0660R Water Pressure Regulator Valve. This valve allows you to set the maximum water pressure with a twist of a screw, and I have mine set at 55 psi. How did I come by that number? Well, the point of a water pressure regulator is to keep possible high-pressure water at the RV park from damaging the pipes and fittings in the RV. On our 34PA, the water pump is right up front in the wet bay, as shown below.
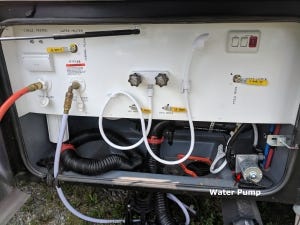

On the label of the water pump the “switch off pressure” is given, and for our water pump that pressure is 55 psi. I figure if Tiffin chose that pump for our RV, then that pressure for city water will be safe. We have found that pressure to be just fine for dishes, showers and so on. Therefore I see no reason to risk higher pressure even though I could raise the pressure considerably if I wanted to since the valve allows it.

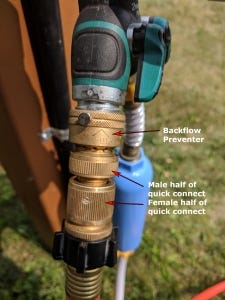
Attached to the downstream side of the pressure regulator I have a 2wayz All Metal Body Garden Hose Splitter connection so I can get water for other reasons outside the RV without having to disconnect the RV water supply. One side of the splitter is the freshwater side, and that never gets used for anything else. The other branch of the Y I use for any number of things, but primarily it is the water source for the black tank flush. For safety, I have a back-flow preventer connected to this branch of the splitter. This prevents water from getting back into the Y and coming in contact with my fresh water.

The back-flow preventer always stays on the splitter. This way, I never get confused as to which side is fresh water and which is not.
Now, I am not all thumbs all the time, but Mireille will tell you that if there is a way to screw something up, I can find it. As an example she would be happy to tell the tale of one Saturday when I was taking a shower and the next thing she saw as she was sitting on the couch in the living room was me coming from the backyard through the living room on the way to the bathroom pulling a large trash dumpster and a shovel.
At any rate, based on past experience, and because I don’t like taking a chance on getting things cross threaded and thereby creating leaks where before there were none, I have quick connects for all my fittings. I bought two pairs of brass hose quick connect fittings which were highly rated. Two pairs, in this case, equals four individual connections, so I have both ends of two hoses connected by these quick connects. I have one male half of a fitting on the output side of the water filter and the female half on my fresh water hose. Then the other end of the hose gets the male half of another fitting, and the female half of that fitting is on the brass elbow going into the City Water connection.
The other pair is usually on my orange “tank flushing” hose, but if I am washing the RV or need more hose length to reach a spigot, I change these up as needed.
There, that is our set up. There is nothing here you could not have figured out, and there is nothing here I figured out for myself. I just took all the good ideas I found from rvlove.com, the rvgeeks, IRV2.com and other places and put them all together into a setup that I am comfortable with, is relatively easy to work with and difficult to screw up…I hope!